How to Display Record Review in Outlook 2016
Journal automatically records actions that yous choose which relate to specific contacts and puts the actions in a Timeline view. You can apply Journal to track Microsoft Outlook items, such as email letters or meetings. Information technology can also track other Microsoft Office files, such as Word documents or Excel workbooks.
Journal keeps a record of any interaction that you want to remember — even something that is non located on your computer, such as a phone conversation or a paper letter that you mailed or received.
Here's how to find Journal.
-
On the Navigation Bar, click
 > Folders > Periodical. (Or just printing Ctrl+eight.)
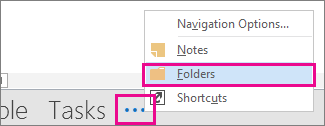
-
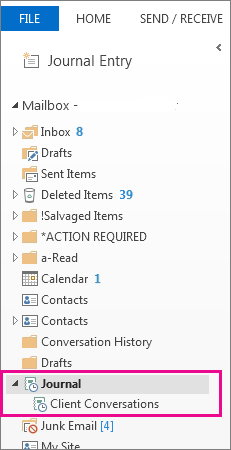
Yous tin work with your existing Journal entries or create new ones from the Folder pane.
-
In the Folder Pane, click the Journal folder.
-
Click Home.
-
In the New group, click Journal Entry.
-
In the Subject box, type a description.
-
In the Entry type box, click the type of journal entry that yous are recording.
-
Select other options that you want.
Note:Previous versions of Outlook included an automated journal characteristic which tracked documents opened in other Microsoft Function applications and Windows. This feature isn't available in Outlook 2013 or Outlook 2016.
-
In Journal, in Timeline view, click View.
-
In the Electric current View group, click View Settings, and and then click Columns.
-
In the Select available fields from box, click the field ready that you desire. This normally would exist Frequently used fields or All Periodical fields.
-
In the Available date/time fields box, click the field that contains the time that y'all want to use as the first time for the detail, then click Kickoff.
-
In the Available date/fourth dimension fields box, click the field that contains the fourth dimension that you want to use as the terminate time for the item, and so click Finish.
Tip:The Timeline view shows when each item and document was created, saved, sent, received, opened, and modified. When you modify the time fields used to brandish items on the timeline, the location and duration of the items may modify on the timeline.
-
Open the periodical entry.
-
Enter a new start date and fourth dimension. To change the end fourth dimension, modify the number in the Duration box.
Notation:Irresolute the times associated with a journal entry doesn't modify the start fourth dimension of the detail, certificate, or contact that information technology refers to.
Tip:To quickly access Journal, y'all can add the Journal view button to the Navigation Pane. At the bottom of the Navigation Pane, click Configure Buttons  , then click Add or Remove Buttons, then click Journal.
Record items and files automatically
-
Click the File tab.
-
Click Options.
-
Click Notes and Journal.
-
Click Journal Options.
-
In the Automatically record these items list, select the check boxes for the items that y'all want recorded automatically in Journal.
-
In the For these contacts list, select the check boxes for the contacts whose items yous want recorded automatically.
-
In the Also record files from box, select the bank check boxes adjacent to the programs from which you want to automatically record files in Journal.
Record an Outlook particular manually
-
From any module in Outlook, on the Home tab, in the New group, click New Items, signal to Other, and then click Journal Entry.
-
In the Subject box, blazon a description.
-
In the Entry type box, click the type of periodical entry that you are recording.
-
Select other options that you want.
Record a file from outside of Outlook manually
-
Locate the file that y'all desire to record. Y'all can use Outlook, Windows Explorer or the desktop.
-
Drag the items to Periodical.
-
Select the options that you want for the journal entry.
Tape the engagement and time yous worked with a contact
-
Open the contact.
-
On the Contact tab, in the Communicate group, click More, and then click Periodical Entry.
-
The electric current date and time appear in the Periodical particular header. To alter the engagement or fourth dimension, click the arrow attached to each box, and and then click the selection you want.
-
To certificate the exact get-go and end fourth dimension, on the Journal Entry tab, in the Timer group, click Start Timer.
The Periodical detail records the date and length of time that y'all worked with the contact. Click Pause Timer to finish the clock.
-
Click Save & Close on the Actions tab to tape the information into your Journal.
Plow off Journal
To plough off Journal, you must clear multiple check boxes in the Periodical Options dialog box. No single pick turns Periodical off.
-
Click the File tab.
-
Click Options.
-
Click Notes and Periodical.
-
Click Periodical Options.
-
In the Automatically record these items listing, clear all check boxes,
-
In the Also tape files from box, clear all cheque boxes.
Note:It is non necessary to clear the check boxes nether For these contacts.
Empty Journal
Emptying Journal involves deleting entries.
-
In Journal, on the Abode tab, in theCurrent View grouping, click Entry List. A table view of all Journal entries appears.
-
Do one of the following:
-
To choose a single entry Click the entry you want.
-
To choose multiple entries Agree down CTRL, and and then click the entries you lot want. If yous desire to choose a fix of side by side entries, click the first entry, hold down SHIFT, and and so click the concluding entry.
-
To choose all entries in a folder Click any entry, and then press CTRL+A.
-
-
On the Domicile tab, click Delete, or press DELETE.
Tip:To quickly access Journal, you can add the Journal view button to the Navigation Pane. At the lesser of the Navigation Pane, click the button, click Add together or Remove Buttons, and then click Periodical .
Do one or more than of the post-obit:
-
Record items and files automatically
-
On the Tools menu, click Options.
-
Click Journal Options.
-
In the Automatically record these items box, select the bank check boxes for the items that you want recorded automatically in Journal.
-
In the For these contacts box, select the check boxes for the contacts whose items you desire recorded automatically.
-
In the Also tape files from box, select the cheque boxes next to the programs whose files yous want to tape automatically in Journal.
-
-
Record a Microsoft Outlook item manually
-
On the File card, signal to New, then click Periodical Entry.
-
In the Field of study box, type a description.
-
In the Entry blazon box, click the type of journal entry that you are recording.
-
Select other options that you want.
-
-
Record a file from outside of Outlook manually
-
Locate the file that y'all want to record. You can use Outlook, Windows Explorer or the desktop.
-
Drag the items to Journal
 .
. -
Select the options that you want for the journal entry.
-
-
On the Tools menu, click Options.
-
Click Periodical Options.
-
In the For these contacts box, select the check box next to the contacts whose items yous want to record automatically.
-
In the Automatically record these items box, select the check boxes side by side to the items that you lot want to tape automatically.
-
Open the contact.
-
On the Deportment carte, click Create, and and so click New Journal Entry for Contact.
-
The current engagement appears in the Journal detail header. For a different date, click the pointer, and and then click a appointment.
-
On the Journal Entry tab, in the Timer group, click Showtime Timer.
The Journal item records the date and the length of time that yous worked with the contact.
-
Open the contact whose journal entries yous want to view.
-
On the Contact tab, click Activities.
-
In the Show box, click Periodical.
-
On the Go card, click Journal.
-
On the View bill of fare, point to Current View, and so click Customize Electric current View.
-
Click Fields.
-
In the Select available fields from box, click the field set that you desire.
-
In the Available date/time fields box, click the field that contains the time that y'all want to utilize as the showtime fourth dimension for the detail, and and so click Beginning.
-
In the Available date/time fields box, click the field that contains the fourth dimension that you want to use equally the finish time for the item, and so click Finish.
The Timeline view shows when each item and document was created, saved, sent, received, opened, and modified. When you change the time fields used to display items on the timeline, the location and duration of the items may change on the timeline.
-
In Timeline view, click the View menu, point to Electric current View, and then click Customize Current View.
-
Click Other Settings.
-
Select the options that you want.
-
Open up the journal entry.
-
Enter a new start date and time.
Note:Moving a journal entry does not change the start time of the particular, certificate, or contact that it refers to.
To plough off Journal, you have to clear multiple bank check boxes in the Journal Options dialog box. No single pick can turn Journal off.
Plow off Journal
-
On the Tools carte, click Options.
-
On the Preferences tab, click Journal Options.
-
Nether Automatically tape these items, clear all the check boxes.
-
Nether Also record files from, articulate all the check boxes.
It is not necessary to articulate the check boxes nether For these contacts.
Empty Journal
Elimination Journal involves deleting periodical entries.
-
Delete a single entry
-
In Journal, click the entry, and then press DELETE.
-
-
Delete multiple entries
-
In Periodical, in the Navigation Pane, under Current View, click Entry List. A table view of all the entries appears.
-
Click any entry in the table, and so press CTRL+A, or on the Edit menu, click Select All.
-
Press DELETE.
-
worshamhamered1992.blogspot.com
Source: https://support.microsoft.com/en-us/office/track-actions-in-journal-31dcbfc2-fafb-4a0d-9396-aee35a9a97fe
0 Response to "How to Display Record Review in Outlook 2016"
Postar um comentário